Tuesday, September 28, 2010

Wiring complete on the 20 M SSB transceiver


I have mounted all components and completed all wiring. Figures starting at the top; front of radio (power on), inside left-side panel, inside top view, inside rear view.

Moving on now to system level trouble shooting and adjusting. Hopefully it will be on the air soon.

Stay tuned...

Monday, September 27, 2010

Finally i can sample UHF signals in time-domain!


I am very excited about this acquisition: I recently purchased an HP182C with HP1801A 1 GHz random sampler plug-in at a local hamfest for a very good price.

Shown in this photo is an (approximately) 280 Mc signal in time domain.

I intend to use this with my UWB impulse radar that i built as an undergrad or possibly build a more modern version.

Stay tuned for more...

Thursday, September 23, 2010

my first book: Small and Short Range Radar Systems


Are you interested in learning about small radar sensors, rail SAR imaging, near-field phased arrays, and applying these sensors to practical applications such as automotive radar and unmanned vehicles?

I will be writing a book titled, 'Small and Short Range Radar Systems,' with co-authors Jonathan Williams (MIT/LL), Shuqing Zeng, and Jim Nickaloau (General Motors). Our publisher is CRC Press. In this work will discuss both theoretical example and practical implementations of small radar sensors and apply these to real-world applications.

Should be an interesting read! Stay tuned for details as we write.

Monday, September 20, 2010

The art of radio design


Creating radio equipment is an art form. Here we have transformed the 'Autodesk' PC box into a radio chassis that appears as though it was built before 1950, but the insides are solid state and scratch-built and designed using high performance low-phase noise LO's, system NF <= 1 dB LNA, etc etc.

This is my interpretation of what a radio should look like.

I painted the chassis using my favorite Rustoleum flat-black and mounted all of the front panel components necessary to operate the 20 M home-brew transceiver.

Saturday, September 18, 2010

Home Brew 20M SSB transceiver: fitting the internal components


Fitting the internal components into the chassis. This is a completely modular design, each part is in its own enclosure. I am using a Power-One linear supply for this radio.

Once complete the chassis will be painted.

Thursday, September 16, 2010

Machining out the chassis


Now that all of the RF modules are complete it is time to machine out a chassis.

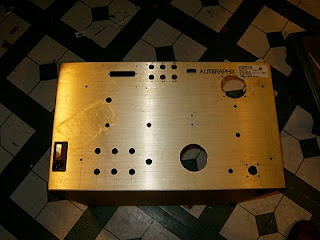
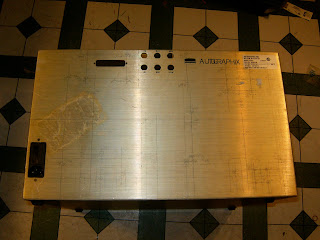
I found an old 'Autographics' computer chassis at a hamfest for $5. It is made out of aluminum which is easy to machine. The front panel is mostly blank, except for a few holes for a D connector and some BNC's.

Radio design is an art for and this chassis will be the perfect canvas for this homebrew 20 M ssb transceiver.

From bottom to top:
->front-panel controls sitting on the chassis used to decide on a final layout
->drill holes measured and drawn on the front of the chassis using 0.5 mm pencil
->front panel after machining (using my drill press)
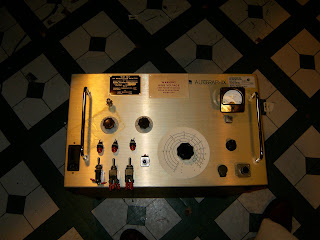

Wednesday, September 15, 2010

completed final output section, decided to go with 18 watt driver


The 80 watt PA with 4 IRF510's was great, but i blew it up when i increased the supply voltage to 24V. I realized that i need to re-do the layout in a more traditional flat-looking package and watch the drive level because i suspect that i over-drove it when it blew up.

For this reason i fell back to my original plan of using only IRF510 and pushing it as hard as possible. What i have here is my final PA in the 20 M SSB project, it is one IRF510 pushing 18 watts out PEP with a 24 V power supply. It is built into a nice bud box just like all other modules in this radio.

Eventually i will build a 100 watt pa to connect to this, but for now i want to get on the air and see how the IRF510 behaves outputting this much power in class A on 20 M before i tackle the 100 watt amplifier again.